|
Download Members: $0.00 Non‑Members: $75.00 |
Buy Now |
Publication Details
| Published Date: | |
|---|---|
| Authors: | Veniamin Stryzheus, Brian Miller, Matthew Chen, Bryan Bramwell, Sabyasachi Basu |
| Download Format: |
Abstract
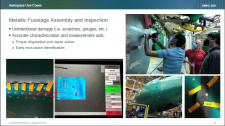
The inspection of surface discontinuities on aerostructures and other flight critical components is an integral part of aerospace manufacturing because it helps to ensure product safety and quality. Proper identification, measurement, and rework of surface discontinuities eliminates risks of crack propagation and other material malfunctions. Historically, surface defects such as scratches and pits have been inspected using optical microscopes, digital depth indicators, or even tactile means. These inspection tools and methods often have a limited ability to accurately quantify defect characteristics or are time consuming and costly to operate.
Recent progress in the fields of optics and tactile sensing technologies has shown considerable promise in revolutionizing the way surface defects can be inspected. One distinct example of such technology is a portable device that was developed by GelSight Inc. This device is a non-destructive 3D imaging system that uses photometric stereo, and an innovative elastomeric gel pad, to reconstruct surfaces with accuracy and speed. The sensor is sensitive to 1 micrometer and can capture fine details in texture and surface geometry. Within seconds one can capture defect depth, height, width, angle, and any other features of interest. Extensive testing in both lab and production environments has shown that utilizing such technology greatly improves inspection performance and product quality.
A few common challenges with incorporating this type of technology has been (1) identifying numeric thresholds that are equivalent with previous qualitative requirements where tactile means of inspection were used, and (2) its ability to scale on larger structures. This presentation discusses a statistical approach that was taken to determine quantifiable thresholds to show equivalency between historical methods that relied on tactile inspection. It also discusses a collaborative effort between Boeing, Siemens, GelSight Inc, and Carnegie Mellon University to automate such an inspection using a 2-stage inspection process which can help with scaling such an inspection on larger structures.
Accurate and repeatable evaluation of surface discontinuities provides a means for improved quality control that standardizes the way defects are addressed in a factory where structurally critical components are produced. Reliable inspection ensures that proper rework takes place to meet design intent and function over the product’s lifecycle. Enabling new digital sensing technologies, like the ones discussed in this presentation, will transform decades-old inspection methods and will help uncover root cause issues to improve production efficiency and quality.


